A response to “Go vegan” as an answer to the current Amazon burnings

I’ve been seeing an increase in posts proclaiming the Go VeganTM gospel in response to the burning of the Amazon rainforest and I have some Thoughts.

First, support the indigenous work on the ground in Brazil –

Articulação dos Povos Indígenas do Brasil

https://coiab.org.br/

https://www.fundopodaali.org.br/


The Go VeganTM rhetoric I’ve been seeing on Instagram, specifically in response to corporate greed leading to burning the Amazon, rings of colonialism, ableism, classism, and the “Urban Mindset” (I don’t really have another term for this?).

  1. Colonialism – Ranching/herding, hunting, and fishing has been accomplished sustainably by indigenous cultures since time immemorial. It’s also culturally important to those cultures that are still thriving and reinvigorating themselves. It seems ignorant to say Go Vegan to coastal/island communities where fish are so important in the culture and diet, to where sustainable hunting of deer/rabbit/etc in the forest is important in the culture and diet, to where the dependence on reindeer/cattle/nomadic herd animals is important in the culture and diet, etc. Also, especially for indigenous communities in North America, a lot of the food culture and knowledge was stolen and destroyed with colonialism. Not all crops grow in all places and the historical crop production and foraging information for much of North America is lost or unknown because of our governments’ and ancestors’ active genocide of native culture and the homogeneity in modern farming. (There are a lot of indigenous food culture revival movements currently happening, check out the Toasted Sister podcast for some really great interviews with native food folks in the Americas, but these movements are not necessarily open to non-natives and they have every right to be closed.)(Also look up the varieties of corn and compare that to what you can buy in your grocery store.)
  2. Ableism – Not everyone CAN physically or mentally make the change to a vegan diet. There are any number of things that can affect diet requirements – allergies, intolerances, gut health, mouth/teeth health, how an individual’s body processes fats/sugars, food textures, eating disorders, physical capability… I mean, “just” depression can make it hard to eat food regularly, never mind the content of those meals/snacks until that person’s mental health improves.
  3. Classism – Not everyone can afford to go vegan. I’ll go into this more in the “Urban Mindset” section, but vegetables** are not universally available. Food deserts exist. If grocery stores don’t or can’t afford to (i.e. bodegas, mom + pop grocers, etc) supply vegetables in your area, you can’t go vegan. If grocery stores supply vegetables at a higher cost than you can afford, you can’t go vegan. Homeless folks cannot access food reliably, never mind a vegan diet. Hell, many places, including cities and native reservations in the US and Canada- affluent countries, cannot even drink the water safely. Those communities do not have the same access to vegetables as wealthier communities. Subsistence hunting, ranching, and fishing is still a major way that people get their food.
  4. The “Urban Mindset” – A lot of the talk revolving around Saving The PlanetTM are very urban centric. Not everyone lives somewhere where you can get to a well-stocked grocery store in a reasonable amount of time. Subsistence ranching, hunting, and fishing is often necessary in rural communities. People can and do farm vegetables and grain, but those are seasonal and if the nearest grocery store is several hours away by car (if you even have a car), then winter/dry season/not growing season is going to be a light on vegetables in order to make those winter/dry season/not growing season preserves last until the growing season returns. Also, not all communities are in areas with long growing seasons or in areas with “good” soil. It’s hard to grow soy in northern Canada, Alaska, Siberia, etc. If you don’t live in a city that far north, your diet likely depends on fish and meat. (That’s an example – there are obviously other places where the growing season is short/hard because of other environmental factors.)

**I’m using vegetables as a catch all, since most of the things I’ve seen VegansTM preach about are a variety of vegetable substitutes, but also non-local herbs, seeds, nuts, mushrooms, grains, etc. will follow the same availability patterns as fresh veg.

My experience is as a white person in a pretty well-off family in the US in a semi-suburban area (used to be more rural when I was a kid, now is pretty suburban), so I have blind spots in regards to other communities around the world, but these are the things that have been pointed out to me via BIPOC response posts on IG and indigenous podcasts in response to ongoing native food and health reclamation work. There are entire continents where I don’t know enough about the food and farming cultures there to point out the issues with the Go VeganTM response (namely Africa, huge swathes of Asia, and I barely understand Australian climate zones).

It’s fine if you’re vegan and you want to share your diet or recipes with people looking to make that change or expand their food choices. It’s fine if you look at the affluent white, able friends you have and suggest maybe less meat to stop supporting factory farming. Maybe suggest local rancher/butchers who supply local sustainable meat or local chicken folks for eggs for the environmental factor, if your affluent white, able friends are opposed to full vegan or vegetarian. Feel free to post about your personal reasons for changing your diet! But the proclamations being passed around feel like *shaming*-

-which does not help folks who don’t have the health/monetary privilege to afford a vegan diet

-which does not help the exploitation of workers and wage issues (and the white supremacy within those structures that cause an increased affect for BIPOC workers) (money=choices)

– which does not help the spread of misinformation about what harms animals that have already been historically bred to need our help to live and are treated well by non-factory farms (sheep/wool, chicken/eggs, cows/milk) or naturally need intervention (honey bees/honey)

-which does not help folks just scraping by day by day, mentally and/or physically

-which does not improve access to and advancement in health care so that more people can make food choices

-which does not change the “diet” culture and fatphobia in Western society that causes disordered eating

-which does not gain universal access to food

-which does not help grassroots food communities

-which does not stop exploitation of indigenous land and peoples in farming and food production

-which does not stop slavery in agriculture

-and which does not dismantle the systems and power in place that has led to this event.


Quilts of 2018

You know, I had fully intended to write a blog post about each of these quilts. I really did. However, I logged in to work on the Winter Wall Quilt post and realized that I finished that quilt about a year ago. Ugh. Good job, me.

That post is, clearly, scrapped and since I only completed three quilts in 2018, that means you get a round-up post instead. Huzzah!


Winter Wall Quilt

20180506_150806

20180506_150722
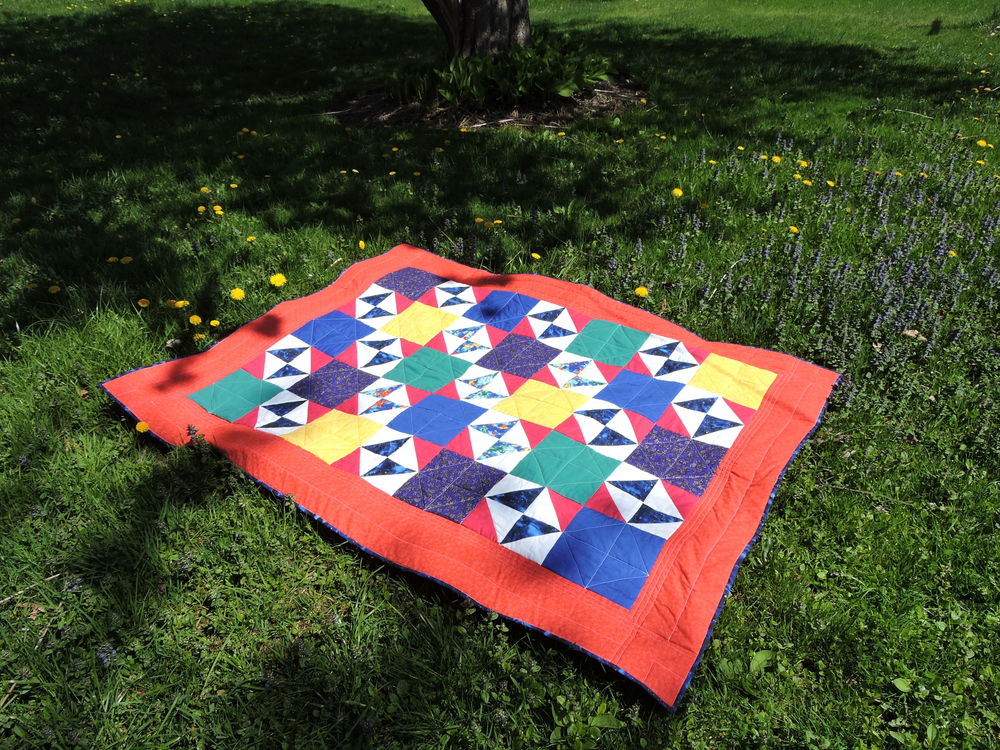
The Winter Wall quilt was made adapting a pattern of the same name from The Weekend Quilter: Fabulous Quilts to Make in a Weekend by Rosemary Wilkinson. The original pattern is for a twin sized bed, but my big 2018 purchase was a full sized bed. This quilt is likely more of a queen size, but I prefer my quilts to drape off the edges of the bed. It covers up the rumpled sheets that I tried to smooth out at 5 am, you know?

The quilt top is made from an assortment of recycled clothing fabrics and discarded stash from my mom’s old fabrics. During college especially, I made a habit of saving the fabric from jeans and button down shirts that were no longer able to be mended or worn without significant holes. Part of the reason why I decided to make a quilt for my new bed was to use up that stash that had been building for over ten years. It wasn’t the easiest thing to sew all these different fabrics together. My sewing machine wasn’t 20180506_1506550always happy about going from a typical quilting cotton to a thick denim, especially when sewing the rows together, but I’m please with the result. The border on this quilt is made from an old fitted sheet from my twin bed. The back is a considerable amount of black cotton fabric that an Instagram/podcast-follower volunteered to send to me for the price of postage while clearing out some old stash from her craft room.

I used the tie method of quilting for this quilt, just because it was so big and cumbersome. I do like the look of it, but I have had problems with my cotton ties untying in parts of the bed where I sit or that move a lot. If I tie another quilt, I’ll have to look into either a tie material that’s less slippery or tie them with longer ends so that they can be re-tied.

This quilt is also the first time I tried a flanged binding. I loved using this kind of binding. There’s considerably less hand sewing and it’s much more forgivable in terms of visible stitching on the front of the quilt. This has become my preferred quilt binding technique in 2018.

20180505_093507While I’m pleased with all the quilts I finished in 2018, this one holds a special place for me. Because it’s almost entirely made from recovered fabrics and destash, it’s seems to me like this is the closest to the spirit of historical quilting. There’s something very satisfying about that. I haven’t examined that too closely, but I think part of my aim in 2019 will be to work through stash. Instead of supplementing my stash with too many impulse fabric buys, I think I’d rather prefer recovering fabric from damaged/unmendable clothing as my main source of quilt materials. I don’t think I’ll ever be a capital-Q Quilter, but I think using quilting as a way to use recovered fabrics will be really satisfying.


The Half Square Triangle Quilt!

20180928_085645

This quilt was one of the craft projects that saved my sanity while I was dealing with 20180928_085706considerable hand pain. The simple shapes, the simple lines to sew and assemble, and the experimenting in machine quilting was a balm to my unhappy brain chemicals over many months in 2018. It was so important to me that I hosted an HST QAL in the Ravelry group for my podcast folks. A few people joined, which I’m grateful for, but it wasn’t very popular amongst my knitting viewers. I mean, I know it’s not for everyone, but I felt really encouraged when a couple of folks joined me.

Honestly, this quilt is one that I’ve been keeping at the end of my bed all winter because it just makes me happy. It’s sort of a manifestation of all the brightness and joy I needed in my life while I’ve been experiencing a lot of physical pain and stress over the last year.

20180928_085759


Halloween Strip Diamond Quilt

20190112_120717

20190112_120747

This was the last quilt I finished in 2018, but if I’m remembering correctly, this is one that I started in 2017. A while back I had the idea that it would be more fulfilling for me to finish a number of quilt tops before taking the time to finish the rest of the quilt assembly. Maybe that’s what I needed at the time, but I don’t think I’m in that place anymore. By the end of 2018, I was just looking for something that I could feasibly finish to get those PROJECT: DONE endorphins.

20190112_120759
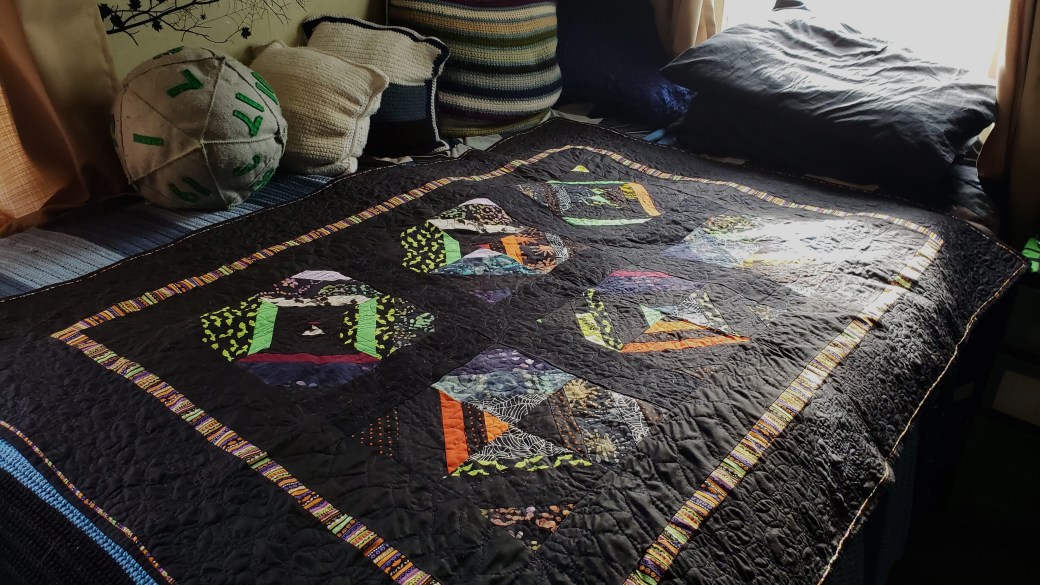
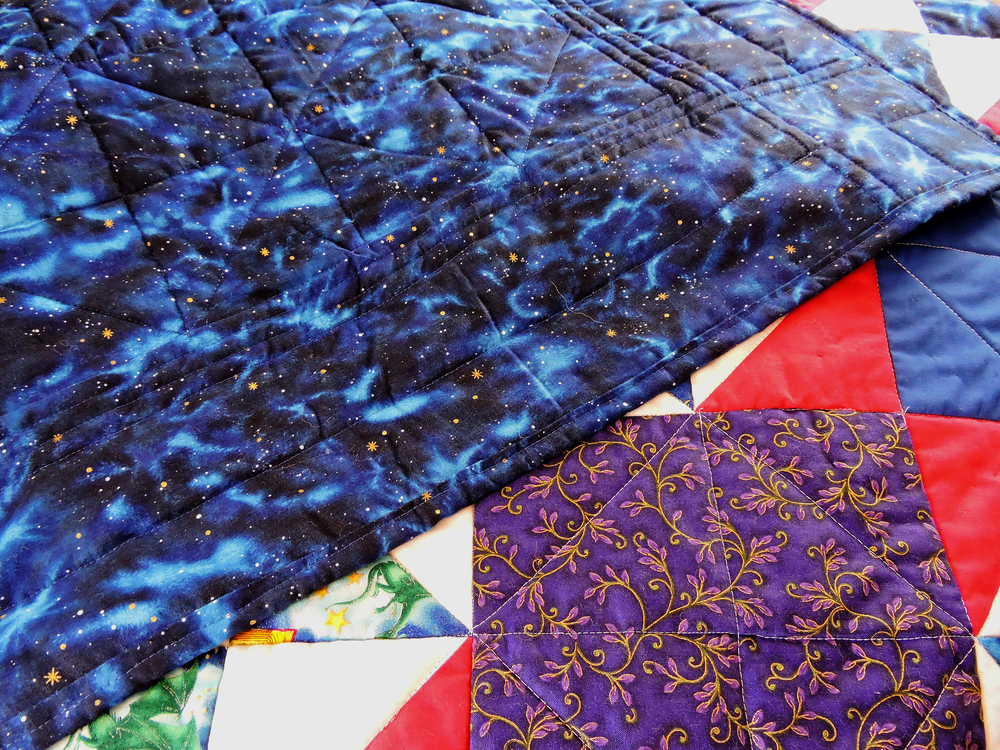
This quilt top was sitting around in my collection of quilt tops and I was reorganizing my fabrics at the same time, which happily resulted in finding that Halloween plaid backing fabric. I had originally purchased it to make a button down shirt, but I know myself better than I did and I’m not comfortable wearing shirts in full bright colors like that. Halloween plaid is perfect, however, for quilt backing fabric and within a few days, I had this quilt sandwich under the needle of my machine. It was done with freeform quilting – lots of experimenting and motif exploration – and I’m pretty pleased with how it turned out.

20190112_120730


So that’s it! Those are the quilts that I finished in 2018! It’s March now and I’m still not sure of my quilt plans for this year, but I’m looking forward to any of those projects that ping my inspiration.

August Dye Experiment

I can’t believe I haven’t blogged about this yet. Where have I been all summer?

This post is about the Great Dye Experiment that The Gabbers and I had at the end of August. I’ve talked about it on my podcast, but it just feels weird not to have also blogged about it.

So back in August, The Gabbers was playing around with dyeing. She had bought some naked, undyed yarn and some acid dyes and was playing around with both natural and acid dyeing. She invited me down to come play with the dyes to see what we could make, since she knew I had grabbed some undyed fiber from the GnomeAcres fiber stock sale over the summer. I had taken a Friday off to play with Penny (the adorable corgi) because both of my parents were on vacation and she had some separation anxiety over their leaving, so we figured I’d bring my fiber and the dog down to my sister’s apartment. The dogs would wrestle all day and we would dye yarn and fiber.

We actually started out with some yarn and not the fiber we’d been talking about. We’d looped our fiber in the recommended fashion (I’m not sure what book we were using) and were soaking it in vinegar to hold the dye later. She had already soaked the naked yarn she had ordered, so it was ready to go.

The first yarn we dyed was very experimental. We weren’t sure the concentration of dye and how saturated those colors would be, so the first skein was really for us to find our feet. We started out by hand painting the yarn to see how the colors would work. I decided to drip the dye onto my first skein to mimic the speckled yarns that are popular right now.


I think both of us were surprised at how low the saturation was when we dyed the yarn this way. I like the result, but it had looked much more saturated before we set the color. We then tried some more hand painting and ended up with a much more saturated yarn.


 Since I’m not intending to replicate this yarn for sale, I’ll explain how I did the color. I arranged my skein on the plastic into a square (ish) shape. I started adding color to the corner sections, then to either side of each corner, and then filled in the straight sides. I have no idea how this will knit up, but I’m excited to see what kind of variegation that created.

Then the fiber was ready to play with. We started out trying hand painting the fiber, since that’s what we had been doing with the yarn. That was kind of a mess. The fiber just drank the dye and stuck to brushes, even when only dabbing straight up and down. I ended up just pouring dye into the fiber and squishing it down to distribute the dye in that section. Luckily, I wanted most of the color to blend well instead of clear color changes in this fiber and I think it worked out pretty well for my pumpkin fiber.


By this time, it was getting late and we knew we needed to speed things up if I was going to go home that night, which was my preference since I hadn’t brought anything with my but the dog and some fiber. So then we started working on some immersion dyeing stuff.

I started out with a braid of fiber in some hot water and just dumping some red mixed dye into the water and letting that cook in. When the fiber had absorbed that, I pulled out that fiber and tied some big, loose knots in it. I dumped it back into the water and poured some blue dye in. When that was absorbed, I pulled it out again and tied the whole thing into one loopy knot, put it back in the water, and poured some darker purpley blue dye into the pot. The goal was the same principle as tie-dye. The first layer of dye would be covered in the knots, so other parts of the fiber would have the blue over-dye. Then both those sections would be covered in the big knot and the purple-blue dye would over-dye only part of the fiber. And this was the result:


I like the way the colors played, but I don’t think I’ll do that with fiber again. The fiber was so sticky when it was wet and I had to be super careful when I untied those knots. I didn’t want to pull the length of fiber apart and I know I partially drafted parts of it when I was pulling the knots out. Luckily, it fluffed up when it dried, so it’s not that noticeable. 

The I did some more immersion dyeing with my last bit of fiber. This one I mostly just played with the amounts of dye in the pot. I had some of the blue and then some of the purple-blue and I actually got a pretty cool effect due to the fiber being too fluffy for the dye pot. Some of the color really concentrated where the fiber touched the pot and the pot strainer and the parts that weren’t touching the pot or pot-strainer has a much softer color dye.


Then I rushed through dying the last bit of yarn, which actually turned out really nice. I threw some yellow into the dye pot, but there was still a little bit of the purple-blue in the pot, so it ended up a light, soft yellow-green. I tied the yarn in a few knots and tossed in some green, tied it into another big knot, and threw in another shade of green. It ended up being this nice sort of light, tonal green that I really like.


And that was my part of the yarn dyeing experiment! Will I do it again? With the space, time, and some money to get started? Sure! It was fun and I liked the yarns I ended up with. I’d love to play with the color dyes more and how they mix with each other, but I don’t think I’ll be able to do it again any time soon. Because of where I live, I cannot block off the kitchen to dye and I do not have the dedicated space for the actual dyeing or the drying. If this is something that I’m really interested in pursuing while I live here, I may pick it back up in the spring and summer and see about using the burner on the grill outside to do the heat setting and the clothesline for the drying.

The only thing I can really see myself doing anytime soon would be natural dyeing with foods. I know onion skins, cabbage, and black beans are among the food items that can dye yarn and I’m sure there are other things that I’m not thinking about right now. I’m definitely interested in doing some more research for that. 

Until then, I’ll just have to enjoy the products of my experiment.

.

Canyon and Handspun Socks

Another older FO post! Let’s get this party started. Today, it’s socks!

Canyon Socks

Pattern: vanilla sock
Yarn: Loops & Threads Luxury Sock in “Canyon”
Needles: US 1 – 2.25 mm


I tried a couple of new things with these socks. Nothing major, but some tweaks that I hadn’t done in combination. I cast these on with 64 stitches. Lots of folks with similarly sized or smaller feet use 64 stitches for their basic socks, so I thought I’d give it a go. These are a teeny bit loose on me, but that’s not unexpected. I have a loose gauge and it was good to know. I also used the Fish Lips Kiss Heel on top down socks for the first time. It worked out well and is a good option for self-striping socks, I think. They look nice and even with matching heels, since I started the heel at the same color change.

All in all, a satisfying knit. They fit well enough and I learned some handy things to know about my gauge, foot size, and heel construction.


Handspun Socks

Pattern: vanilla sock
Yarn: Handspun out of 4 oz Frabjous Fibers BFL in “Dunedin” – chain plied and spun on my Ashford Kiwi 2
Needles: US 1 – 2.25 mm


Oh boy. These were an adventure. I made these for the Yarngasm Podcast’s Sock Spin and Knit Along. The goal was to spin your yarn and knit it into a pair of socks. I had a great time spinning the BFL I chose, but looking back on it, I think I needed to spin it a little finer to get more length out of it. The finished yarn was thicker than a fingering weight, so the yardage was a little short for my feet. In fact, if I hadn’t noticed, I would have run out of yarn part way through the toe decreases. Or I should have spun a little of another fiber to do contrasting heels and toes. I would have had plenty of the BFL for the socks if I had done that.

But alas, I had not and I played an epic game of yarn chicken. I skipped a bunch of plain knit rows in the toe and increased the decreases. By the end of it, I was knitting from both ends of the last bit of yarn and had to stop when I had a foot between them because I had to kitchener about 20 stitches for each sock. 

With a commercial yarn, there’s no way these socks would have fit me. Lying flat, even after blocking, they’re almost an inch shorter than my foot. But, because the yarn is thicker than a fingering weight and it was chain plied, there’s a lot of stretch to the knitted fabric I ended up with, so they actually fit my feet fine when I put them on.

I have two other 4 oz braids upstairs that I think would make nice socks like these. When I spin up those, I’m definitely going to be spinning up that other bit of fiber for contrasting heels and/or toes. That was a scary game of chicken and I’m not keen on doing it again, even if the socks turned out alright.

.

Dragon Quilt

My dragon quilt! It is done!

I’m still pretty amazed that it’s finally done. I can’t even remember when I started working on this. It was last year sometime during the summer, so it must be coming up on a year now. I started planning this quilt when I nabbed The Weekend Quilter from a listing on Paperback Swap. It’s a neat little book and has a lot of quilt patterns that the book claims can be made in a weekend. I honestly don’t think that’s the case unless you already have your fabric, batting, binding, and threads all chosen and purchased before you begin, but the construction of the ones I’ve really read through do look like something you could dedicate a weekend to and come out with a finished quilt. 


This one in particular is done using the pattern called “A Piece of Summer” from The Weekend Quilter. You can see that there’s nothing radical about the construction. The squares are about 8”, which makes cutting the plain squares quick and easy, and the pieced squares are done using some pretty basic right triangle techniques, which are clearly explained in the pattern. It didn’t actually take me long to piece together the top. I think picking out my fabric colors took longer. And I like that this top mixes really simple plain squares with simply pieces squares to make this look a little more complicated than it is. 


I don’t know if you can see from these photos, but the color basis for this quilt are all pulled out of those little triangles of dragon fabric. This dragon fabric has gone through a lot. My mom originally bought this to make my youngest brother some curtains when he was little. Unknown to me at the time of starting my dragon quilt, my mom had also started working on a quilt using this fabric to base her colors on. So my little scraps there? They’re the scraps of some scraps. It’s kind of amazing that you can do that with quilting. The blue and the green also came from my mom’s quilt scraps and the white fabric came out of the collective trunk of fabric in our house. I bought the purple, pink, yellow, and backing fabric from Jo-Ann’s using a few coupons. The red fabric came from a haul that my sister had gotten from our grandma that she used for a photography project in college.


I’ve posted about my first quilts before, so I didn’t expect to have any issues with the actual quilting part of making my dragon quilt. I was wrong! First, I tried to quilt this using invisible thread for the top and cotton thread on the bottom. This didn’t work out. The invisible thread kept pulling the cotton up out of the top, regardless of what I did with the machine tension. So I ripped that out.

Then, I thought I’d try doing the blue for both sides, but I didn’t like how that looked on the top, so I ripped that out, too.

By the time I had decided on blue for the back and white for the top, my sewing machine started fighting me about everything. I was using a Singer Inspiration at the time, which I had gotten as a gift about a decade ago. I used it in spurts for most of its life – really heavily for a week or two and then not at all for months. I know I didn’t really take the best care of it because it was my first sewing machine and the poor thing had been dragged to and from college for four years. Not an easy life for a sewing machine. My sister had the same machine and had used it in a similar way and both of our machines started acting up at around the same time. Nesting regardless of tension settings, increased motor noise, and mine started this fun game of jerking the needle to the left every 20-30 stitches so that even the straightest of lines looked terrible. It was awful.

I bought a new sewing machine with my tax return earlier this year, but I kind of avoidable working on the quilt for a while. There was just so much aggravation with the old machine that I didn’t want a repeat of those machine fights. But once I actually sat down with the new machine and the quilt, I flew right through the rest. Only the binding really gave me any pause, but that’s mostly because I’m not great at making binding strips yet, so the back on the quilt had some uneven binding flaps. That was easy enough to fix with some quick hand sewing.

The finished quilt fits the top of a twin sized bed, which I think is probably the case with the other quilt patterns in The Weekend Quilter. It’s a great quilt to do and I’m really pleased that I finished it. It’s now another layer on my bed and it makes me happy to have it around in my room instead of tucked away upstairs in the craft room.

.

Ribbed Cowl and Ribbed Hat

If you watched my Youtube video/podcast/whatever episode, you’ve already seen these finished objects. But I have somehow managed to completely miss posting them onto the blog! So here’s fixing that.


Pattern: This is one that I improvised. I cast on a bunch of stitches and knit 1×1 rib of each color until I ran out.

Needles: US 5 – 3.75 mm

Yarn: Buffalo Wool Company – Splash of Color mini-skeins

I’m pretty sure I cast this one on during one of my snow days in January/February. I remember I was working from home and my work-at-home was moving very slowly. I would spend a minute or two waiting for pages to load or processed to complete, so I just picked up the left over Buffalo Wool Company mini-skeins left over from my linen stitch cowl and started knitting. It was just something quick and simple to put my hands to use and I really like how it turned out.

I’m not sure if I will end up keeping this one. I’ve started a bin for things to gift or sell at a future date. I have a ton of things in my Ravelry queue that I want to make that I won’t use, so I figure I ought to save those things up so that other people will enjoy them. 


Pattern: I improvised this one, too. I just cast on a fewer stitches than the ribbed cowl, knit 1×1 rib for a bit, then stockinette until it looked like I was going to start running out within the next few rows. I did a couple of decrease rows alternated with straight knit rows until I ran out of yarn, then pulled the end through and gathered up the stitches.

Needles: US 5 – 3.75 mm

Yarn: This is actually the very first handspun I ever bought, which was at a little knit stand at the New York Renaissance Faire about a decade ago. I lost the tag a long time ago, so I’m not sure the fiber content, but the white is super fluffy and the navy blue is more sleek.

This was another stash busting project. I’ve had this yarn for about a decade and it had become several things, but there was never really enough of it for the things that I really wanted to make. I know this sounds crazy, but I just started getting into making and wearing hats. There wasn’t really enough yarn for other things, but there was definitely just enough to make a cozy hat!


.

Commissions for Coworkers Part 2

I’m nearing the end of the list, finally. Five coworkers commissioned 1 or 2 things each all at the same time before Christmas and it’s been nuts trying to get them done. I only have 2 definite projects left, with a tentative idea for a cowl that may end up on the needles, but the end of the coworker list is in site.

In the mean time, here’s a few things I have managed to finish.


Giving is Receiving


Pattern: Giving is Receiving by Uma Padu

Needles: US 5 – 3.75 mm

Yarn: SMC Northern Chunky Brown

I had to modify this pattern a bit because the yarn used to match the hood scarf I made this coworker was discontinued and I had very little of it left to work with, but I think they turned out pretty good. I’ve made enough fingerless gloves by now that I can fiddle with them and the chunky yarn is pretty forgiving to work with.

Graham Hat


PatternGraham by Jennifer Adams

Needles: US 4 – 3.5 mm & US 6 – 4.0 mm

Yarn:  The Ugly Room in Mermaid Tails and Lion Brand Pound of Love White

I really like the Graham hat pattern. It’s a pretty simple pattern that looks great in a hat. Also, hats are quick and I love this yarn, so it was nice.

Mulberry Hood Scarf


Pattern: My own pattern

Needles: US 8 – 5.0 mm

Yarn: Lion Brand Wool-Ease Chunk in Mulberry

Another hood scarf! There’s really not much else to say at this point about these, except that I am working on getting the pattern written out to put up on Ravelry.

Huzzah!

.

Hazel the Humpback Whale

Finished a new stash busting project!

I don’t know if I’ve mentioned it. I may have in the Christmas ornament round up in January, but one of my goals this year is to bust stash. There’s a lot of stuff in my stash that has been there since I started yarn crafting over a decade ago. So I’m resolved to use up some stuff before the fall when I buy new stuff from yarn events.

And here’s a stash buster I finished!


Pattern: Hazel the Humpback Whale by Bec Brittain

Yarn: Holiday Yarns Grab Bag scraps, Merry Little Lamb handspun scraps

Needles: US 0 – 2.00 mm


I was actually intending to use these yarns for more Christmas ornaments. That was the plan. But I went down a pattern rabbit hole on Ravelry and stumbled upon this pattern for a humpback whale, which I found fascinating. I must have gone back to the pattern page half a dozen times to look at Bec Brittain’s Hazel. I knew I didn’t have enough black or dark grey to pull off this pattern, but I thought a scrap striped whale would be charming. 

And she is! She lives on my printer when the paper feed is closed, so I can just look over and see her when I’m sorting things out on my laptop. 

Also, can I just say that I love her beady little eyes? During college, I had an amigurumi phase and bought a whole bunch of safety eyes and I went through a couple of them to see how they would look on Hazel. I ended up using the smallest ones that were plain black, but they pop out nicely out of the green.

She’s about 2 ft long from nose to tail, which is only a little smaller than the pattern says will be produced in DK weight yarn, but I also have a loose knitting gauge, so that was not unexpected.

The pattern could be a little bit confusing at times. There are updates and corrections listed on the pattern page, but I didn’t end up looking at them. I just fudged any differences until I got the right numbers. I figured it wouldn’t be a big deal  on a whale. Organic creatures are not exactly symmetrical and any irregularities from my knitting would look normal on a whale. 

Also, this is a tricky pattern to keep track of. If you’re a beginning knitter or a knitter without plush-knitting experience, be prepared to keep notes or a notebook on you. There are very few repeating rows in the body of this whale. There’s a bit around the middle where there are a few knit rows in a row, but mostly there increases or decreases in every row. There isn’t a set sequence of rows that you can expect to follow due to the shape of the humpback whale. 

The fins are also finicky. The first front fin gave me a little trouble because it was hard to see how the shape was created until I nearly reached the end, which is why there is one front fin and one tail fin that is smaller than the other one. I kept the tension tighter in my confusion over some of the increases and decreases, so the second one knit much more smoothly and a little larger. 

If you tackle this pattern, I’d recommend whip stitching the ends of the fins closed and blocking them out before sewing them to the body. My fins were pretty  scrunched up from being in my hands, which made the ends wavy. I whip stitched them shut, soaked them in water, squeezed out the excess water, stuck them into a folded towel, and lightly pressed them with an iron so that the edges of the fins were nice and defined. Then I unfolded the towel and let them finish drying naturally.

And that’s Hazel! 😀